Today I Learned: Enabling Horizontal Pod Autoscaler(HPA) in Kubernetes
Solving 'Unknown' Current Resource Value in HPA Target to allow horizontal autoscaling in Kubernetes.

It’s been a while I didn’t post any updates. It’s so busy lately, and it’s hard to find free time to write an article in this past few weeks. So, in this rare chances, I want to write something that I learn today.
For an introduction, so, currently, I’m trying Kubernetes for my side project. It’s a side project of a mobile application. The landing page can be seen in https://mabar.id and currently it’s only support for android application, can be downloaded from play store here.
I’ve been working on this project for a few months, and I do this with my friend. I’m working on the backend side, the API, and the Infra side, I use Kubernetes in this project.
So today, I learn something new when trying to implement horizontal scaling with Kubernetes. Previously, Kubernetes actually has an object called HPA (Horizontal Pod Autoscaller). The details about this HPA can be seen in the official documentation.
At first, I think it should be easy to implement this. Just to add the object in the deployment script, and it should be handled by the Kubernetes clusters.
Problems
But, it’s not as easy as that. So, to simulate the real case, I will write how is the actual problem before it solved and how I solve it.
So let’s say, I want to deploy the landing page of https://mabar.id in Kubernetes. And I want to add the HPA as well. The reasons to do this:
- Want to know how to implement HPA
- Even the landing page is still so new, I believe no one will visit it, but just in case it’s has a huge request, just to prepare it anyway :D
At first, after seeing many blog-post and official documentation of Kubernetes, I found how to create HPA for the pod in Kubernetes.
apiVersion: autoscaling/v2beta1
kind: HorizontalPodAutoscaler
metadata:
  name: landing
  namespace: landing-page
spec:
  scaleTargetRef:
    apiVersion: apps/v1beta1
    kind: Deployment
    name: landing
  minReplicas: 1
  maxReplicas: 10
  metrics:
  - type: Resource
    resource:
      name: cpu
      targetAverageUtilization: 70
Just with this simple script, it should be run automatically. That was my first thought.
So, then, I’m trying to test it. I do a load testing to the server.
$ hey -c 50 -z 5m https://mabar.id
I’m using hey as my load testing tools. I create a 50 concurrent call for 5 minutes to the landing page.
Normally, it should be deployed a new pod replica as the request come become huge and huge. But what I see instead that, my pod is just crashing and restarting. I’m curious why this happened. And later, after looking for the HPA details, I see a weird thing.
$ kubectl get hpa
NAME      REFERENCE            TARGETS         MINPODS   MAXPODS   REPLICAS   AGE
landing   Deployment/landing   <unknown>/70%   1         10        1          74d

Target is unknown in HPA
Or in the detail version, with describe command.
$ kubectl describe hpa landing
hpa describe with unknown current resources
In the metrics section, it shows <unknown>/70%. Why does this happen?
Solution
So after searching for many solutions and StackOverflow question, luckily there’s an SO answer that really help me, why my HPA is not working.
So, after I learned from the SO answer, I think my Kubernetes cluster is still doesn’t have the metrics server to retrieve the current used resource on the pods.
So the solution is I must install the metric server in my Kubernetes cluster. The metric-server that I need to install can be found in this repository: https://github.com/kubernetes-incubator/metrics-server
Actually, if we go to the repository, it already shows how to implement the metric-server to Kubernetes cluster. But, I’ll copy the steps from the Github repository here.
Steps
- Clone that repository
$ git clone https://github.com/kubernetes-incubator/metrics-server.git
.....
$ cd metrics-server
- Deploy the configurations with
kubectlcommand.
$ kubectl apply -f deploy/1.8+/

apply the metric-server deployment
- And the next step is, to edit the metric-server deployment flag
$ kubectl edit deploy -n kube-system metrics-server
- And add the flags arguments as needed. All the available flags can be seen in the Github repository. But I just used the default one that displayed in the github repository
args:
 - --kubelet-insecure-tls
 - --kubelet-preferred-address-types=InternalIP,ExternalIP,Hostname
- Add it and save it.
$ kubectl edit deployment metrics-server

Edit the deployment for metrics-server

Edit and add the arguments for the containers of metrics-server
*Oh yeah, the metrics-server will be deployed in kube-system namespace, so if you can’t look the deployment name, maybe you can switch the namespace.
- And after editing the deployment config, the HPA should be working now

The HPA Status
Testing the HPA
And after editing the deployment configurations with the required arguments. The HPA should be working right now. To prove it worked or not, I try to create a load test again with the high concurrent request. And also looking for the HPA details and pods status in Kubernetes.
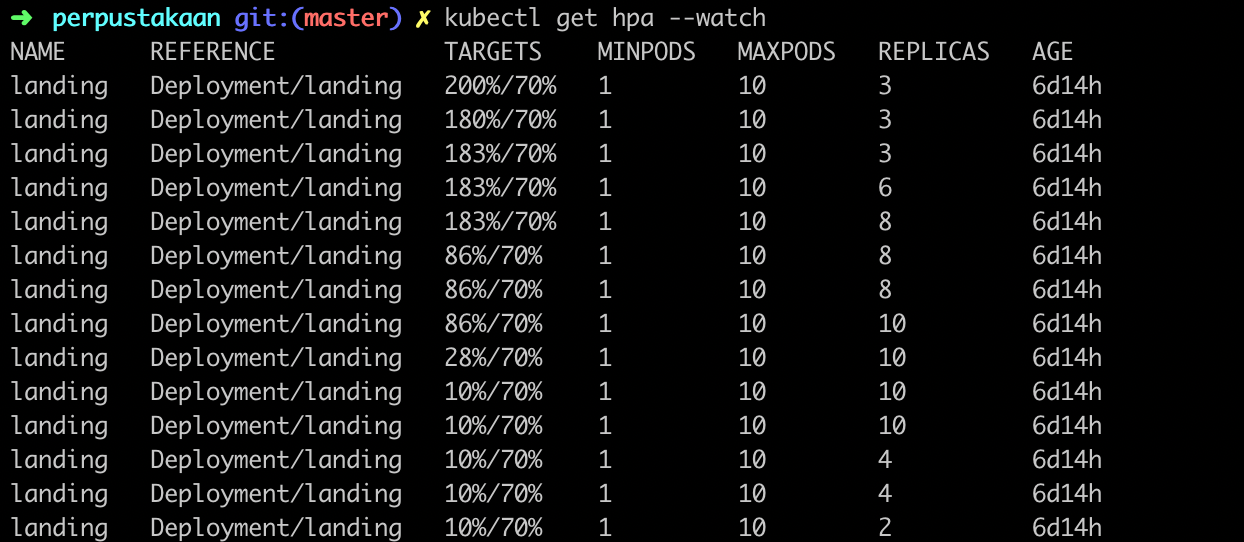
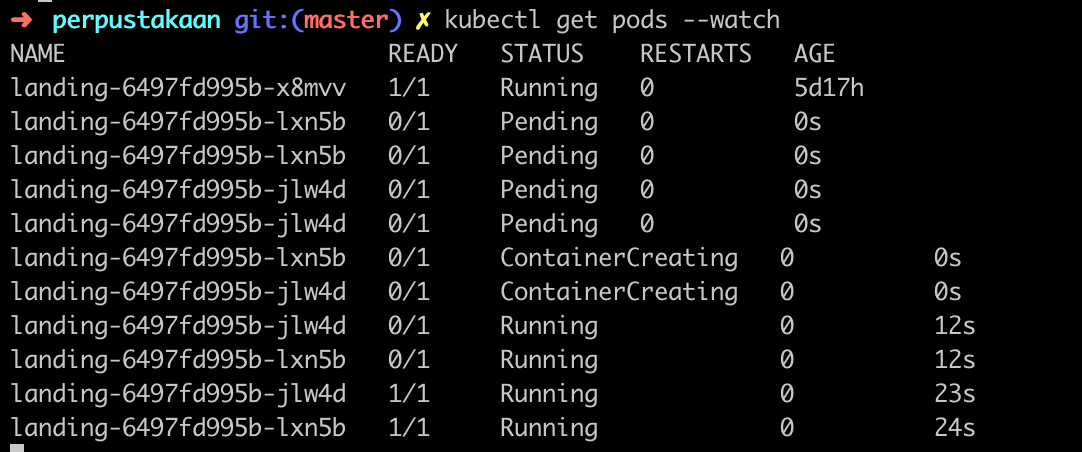
The HPA already works perfectly now. If the request consumes exceed the target resources, the HPA will deploy a new replica of our pods automatically. And if the request usage goes down again to normal, the HPA will delete our pod’s replicas automatically.
This is the screenshot to the HPA status if I watch the HPA in the details.

The HPA detected the current request and add replicas if needed
And this is the screenshot that happening if we watch the pods status. It will deploy a new pod according the HPA status.

A new pod will deployed automatically
Takeaways
So to enable the HPA, we also need to install the metrics-server in our Kubernetes clusters. It’s not enough just have the HPA scripts. Because the HPA will need the metrics-data to do its job.
And well, what I write here is just the default steps, actually, you can customize the deployment config for the metric-server like what Prafull do in his answer in Stackoverflow.
But today, I learned something new to me. It needs 2 hours for me to understand and fix this by myself. Maybe the practice that I made is still not the best one. But for now, it solved my issue. I’ll learn the best solution later.
And I look forward to learning something new again in the future related to Kubernetes and Software Engineering.
References: